命令模式
本文共 2070 字,大约阅读时间需要 6 分钟。
说明
本文转载自:
命令(Command)
介绍
命令模式(Command Pattern)是一种数据驱动的设计模式,它属于行为型模式。请求以命令的形式包裹在对象中,并传给调用对象。调用对象寻找可以处理该命令的合适的对象,并把该命令传给相应的对象,该对象执行命令。
Intent
将命令封装成对象中,具有以下作用:
- 使用命令来参数化其它对象
- 将命令放入队列中进行排队
- 将命令的操作记录到日志中
- 支持可撤销的操作
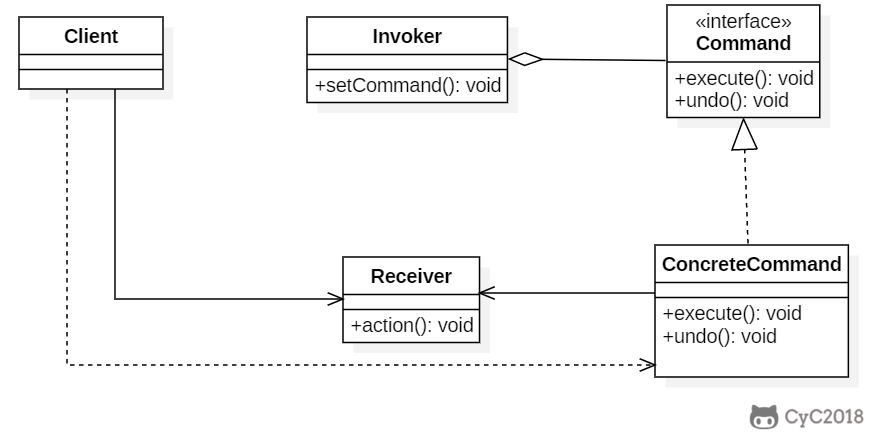
Class Diagram
- Command:命令
- Receiver:命令接收者,也就是命令真正的执行者
- Invoker:通过它来调用命令
- Client:可以设置命令与命令的接收者
Implementation
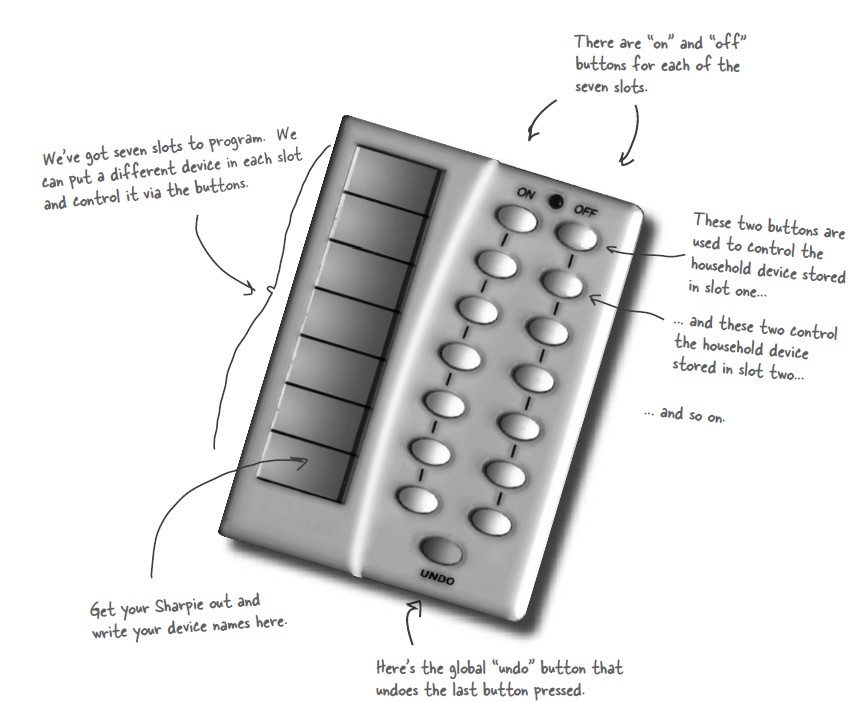
设计一个遥控器,可以控制电灯开关。
public interface Command { void execute();} public class LightOnCommand implements Command { Light light; public LightOnCommand(Light light) { this.light = light; } @Override public void execute() { light.on(); }} public class LightOffCommand implements Command { Light light; public LightOffCommand(Light light) { this.light = light; } @Override public void execute() { light.off(); }} public class Light { public void on() { System.out.println("Light is on!"); } public void off() { System.out.println("Light is off!"); }} /** * 遥控器 */public class Invoker { private Command[] onCommands; private Command[] offCommands; private final int slotNum = 7; public Invoker() { this.onCommands = new Command[slotNum]; this.offCommands = new Command[slotNum]; } public void setOnCommand(Command command, int slot) { onCommands[slot] = command; } public void setOffCommand(Command command, int slot) { offCommands[slot] = command; } public void onButtonWasPushed(int slot) { onCommands[slot].execute(); } public void offButtonWasPushed(int slot) { offCommands[slot].execute(); }} public class Client { public static void main(String[] args) { Invoker invoker = new Invoker(); Light light = new Light(); Command lightOnCommand = new LightOnCommand(light); Command lightOffCommand = new LightOffCommand(light); invoker.setOnCommand(lightOnCommand, 0); invoker.setOffCommand(lightOffCommand, 0); invoker.onButtonWasPushed(0); invoker.offButtonWasPushed(0); }} JDK
你可能感兴趣的文章
Navicat 导入sql文件
查看>>
navicat 添加外键1215错误
查看>>
navicat 系列软件一点击菜单栏就闪退
查看>>
Navicat 设置时间默认值(当前最新时间)
查看>>
navicat 连接远程mysql
查看>>
navicat:2013-Lost connection to MySQL server at ‘reading initial communication packet解决方法
查看>>
Navicate for mysql 数据库设计-数据库分析
查看>>
Navicat下载和破解以及使用
查看>>
Navicat中怎样将SQLServer的表复制到MySql中
查看>>
navicat创建连接 2002-can‘t connect to server on localhost(10061)且mysql服务已启动问题
查看>>
Navicat可视化界面导入SQL文件生成数据库表
查看>>
Navicat向sqlserver中插入数据时提示:当 IDENTITY_INSERT 设置为 OFF 时,不能向表中的标识列插入显式值
查看>>
Navicat如何连接MySQL
查看>>
navicat怎么导出和导入数据表
查看>>
Navicat(数据库可视化操作软件)安装、配置、测试
查看>>
ndk特定版本下载
查看>>
NDK编译错误expected specifier-qualifier-list before...
查看>>
Neat Stuff to Do in List Controls Using Custom Draw
查看>>
Necurs僵尸网络攻击美国金融机构 利用Trickbot银行木马窃取账户信息和欺诈
查看>>
NeHe OpenGL教程 07 纹理过滤、应用光照
查看>>